Following the work from my first post. I wanted to now re-direct the APEX domain, that is, vaibhavnath.in to blog.vaibhavnath.in.
Switching Name servers
At this stage each request made to the domain gets served by GoDaddy’s servers and this is fine until we have to do something a little more than just basic DNS forwarding. Here comes Hetzner. It is a german company which provides dedicated servers and several hosting options. Its DNS management frontend is simple, modern and offers a powerful API for further automation. Although, that was not the only reason why I chose Hetzner. DNS management came as an add-on I was already using Hetzner for something else but that’s a blog series in itself. 😉
First we start with telling GoDaddy that different name servers will be used. For this, we again head to GoDaddy’s Domain page. Then navigate to DNS > Nameservers. Here you can add the custom nameserver address. Since, I am going to use Hetzner, the addresses are hydrogen.ns.hetzner.com and oxygen.ns.hetzner.com. You should find the addresss for your respective DNS management service. Once done, we can log out of GoDaddy and head to Hetzner to configure further.
DNS Records in Hetzner
We first start with defining a zone. This is nothing but the domain-name that you have registered. All records related to this domain will be further created in this zone. Once done, we create a CNAME record where Name=blog.vaibhavnath.in and Value=vaibhavnath-jha.github.io.. Do mind the dot at the end of the Value string. This tells Hetzner that the Value is the apex/root domain and to not concatenate the zone-name at the end.
After completing the above step we have successfully replaced GoDaddy. Now, we can visit this page via blog.vaibhavnath.in. Now, for the main part, we make our way to Netlify.
Netlify business
Netlify is another cloud computing company where we can deploy a serverless backend service for free. Here, we manually deploy a small website whose single job is to re-direct to blog.vaibhavnath.in. For this purpose, create a file wihtout any extension and name it _redirects. In this file, I added the following,
/* https://blog.vaibhavnath.in/:splat 301!
We need to create another file index.html but this can be left blank.
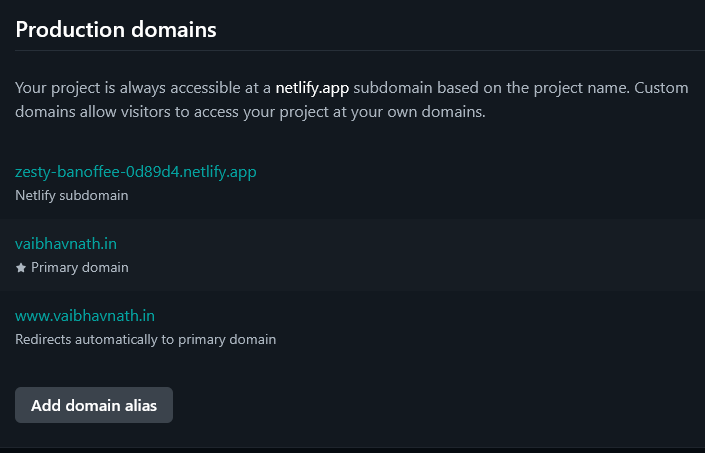
Next, we zip these two files, drag and drop this zipped file in manual upload section in Netlify, and deploy our website. Once deployed, Netlify will generate an address for this website. In my case, it was zesty-banoffee-0d89d4.netlify.app. And if you visit this site, you will be re-directed to blog.vaibhavnath.in (it is getting repetitive, isn’t it 🤐).
Finally, I can add my registered domain as a custom domain in the Domain Management section in Netlify. Here’s a screenshot.  .
.
Another CNAME record in Hetzner
Our job is now 80% done. All we have to do is tell Hetzner to link my apex domain with the Netlify address. This is a repeated step, we create another CNAME record this time the values are Name=www.vaibhavnath.in and Value=zesty-banoffee-0d89d4.netlify.app..
Adding an A record
The last step is to add another record, this time it is an A record, short for Address record. This effectively activates the CNAME record we created earlier by pointing the host to an IPv4 address. The address in question here would be the Netlify’s IPv4 address. This is how the records table is looking in my DNS management panel. 
Once all this is configured and the domain name is propogated completely with Netlify’s server. It should automatically fetch an TLS certifcate and you will have a secure address, i.e., https://www.vaibhavnath.in
Outro
This completes the blog101 series. Next, I start a series on which I have been working on for the last 9 months. So, you can call it my baby. A small hint, it has to do with ☁️.
Update 26.09.2025: The blog about ☁️ is out, you can read it here.
Until then, 😊VJ